
Using multiple strands of yarn to create a colorful fabric is one of the most beautiful forms of knitting, imho. This is also known as Fair Isle knitting, (named after an island of Shetland in northern Scotland where it has long been practiced), particularly when traditional colors and motifs are employed. Instructions for the pattern(s) are generally charted out on a graph, rather than written out in words. Using charts for color-work (and other types of knitting) is easy and doing so facilitates keeping track of where you are in your knitting and thus you can more easily catch mistakes. Even though they are the greatest thing since sliced bread, a lot of folks find charts intimidating or confusing. So today, I’m going to start with the basics and just cover how to use a color-work chart while knitting in the round. [Knitting color-work back and forth (or flat) is technically doable but is not suitable for the faint of heart; certainly not a beginner who is just learning how to read charts so I am not covering that in this post.]
So let’s start with the simple chart below. I’ll cast on, interpret, and show photos of my progress and hopefully you can see how easy it really is to follow a chart and really jump-start your knitting. One absolutely essential tip: as you are knitting, separate each and every individual repeat with stitch markers. You’ll see some green ones in my photos below.

There are a bunch of details to notice in this chart. Let’s pick it apart! In this chart, 2 colors are used; black and white. You can make your own color substitutions (let’s say red and yellow) and still follow the chart–just remember which of your colors is black and which is white. Your knitted version will look like the chart itself; what you see graphed is what you get when knitted. Or, at least one repeat of it, anyway. If you get halfway done and what you are knitting looks nothing like this chart, something has gone drastically wrong and you should stop. What is given here is a single repeat of the pattern. It is 12 stitches wide (note the numbers on the bottom and the top) and consists of 13 rows. You will repeat these 12 stitches (repeats) over and over as you work each round of your project. Here’s where folks get confused: A GRAPH IS NOT READ LIKE WORDS AND SENTENCES ON A PAGE (upper left to lower right); RATHER, IT IS READ IN THE SEQUENCE THAT YOU ACTUALLY KNIT IT (lower right to upper left). That changes everything doesn’t it? (sorry to yell, lol).
Lastly, you might have noticed that the chart does not have square cells. Knitting software used for charting often depicts the cells like this since a single knit stitch is not actually square but elongated. So if you are trying to plot a lifelike portrait of Elvis, your image will look distorted unless you use a graph like this one. That being said, I absolutely use basic graph paper with square cells for my initial pattern sketches.
So…the first thing I will do when using this chart is start knitting stitch 1 (bottom most row of numbers) of row 1 (right column of numbers). I will then progress to the left and work stitch 2. And so on. Let’s see what that looks like, shall we?

I’ve cast on 40 stitches in black. I will work 3 repeats of 12 and add 4 extra stitches for edging: 12 x 3 + 4 + 40. I’ve knit Row 1, which is all black so no problem there.
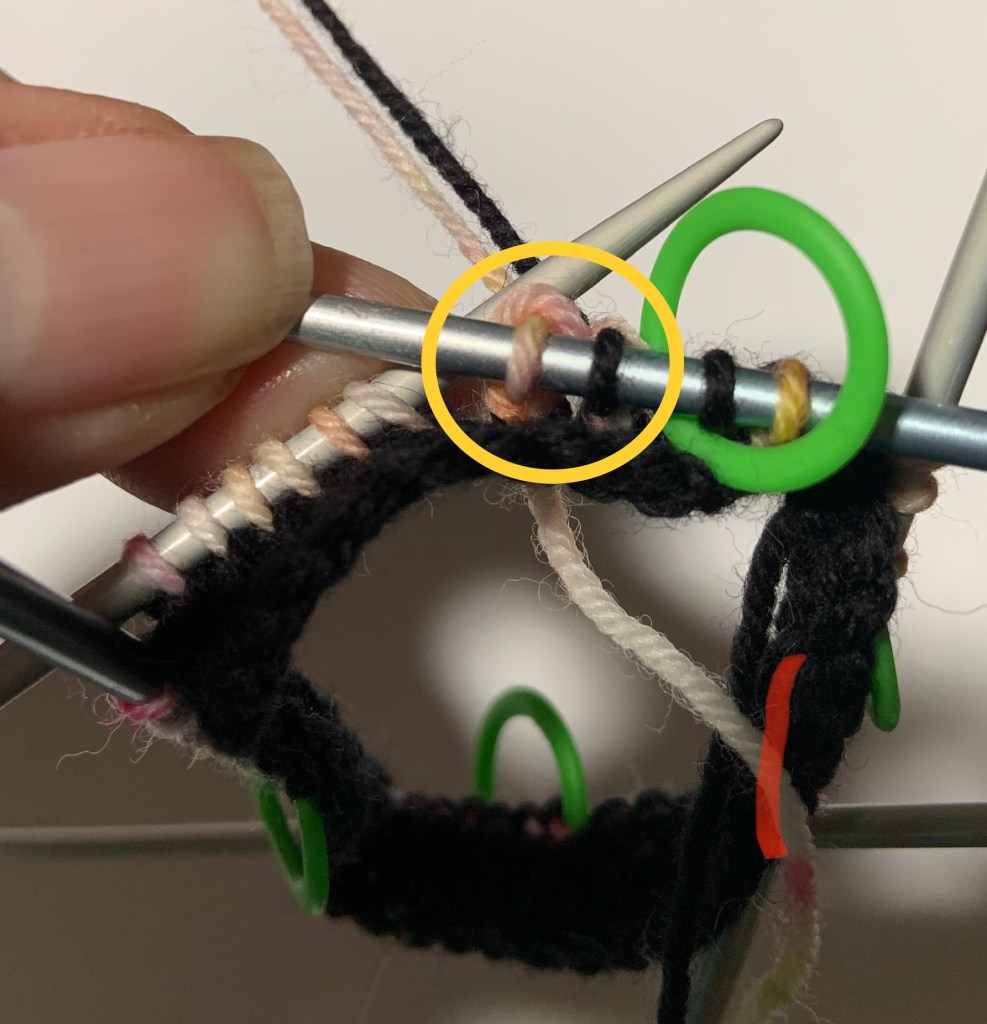
Likewise, Row 2 is easy-peasey, all white (or pink variegated in my case). So here is a photo of when the fun actually starts: the beginning of Row 3. If you check the chart, you’ll see that Row 3 starts with one black stitch followed by 11 white stitches, The green stitch marker on the right signifies the beginning of the repeat. I have circled the first two stitches. As per the chart, I have knit the first one in black and the second one in pink. I’ll continue knitting towards the left as one does and finish that repeat. When I’m done with the first 12 stitches, I’ll be at the next stitch marker and ready to start over at stitch 1. I’ll continue in this manner all the way around.

By now, I have been chugging along and am working Row 6. [scroll up and check the chart again!] In the yellow circle you can see the first 5 stitches of the repeat: black, black, white, black, white. In the blue circle, you can see the ending 4 stitches of the repeat: white, black, white, black. I am depicting them like this so that you can see that where they come together makes the beginning of a motif. Motifs are often split up this way.

Look, our motif has grown! I have just worked Row 7. Once again, I started with stitch 1 of Row 7 which, according to our chart, is a black.
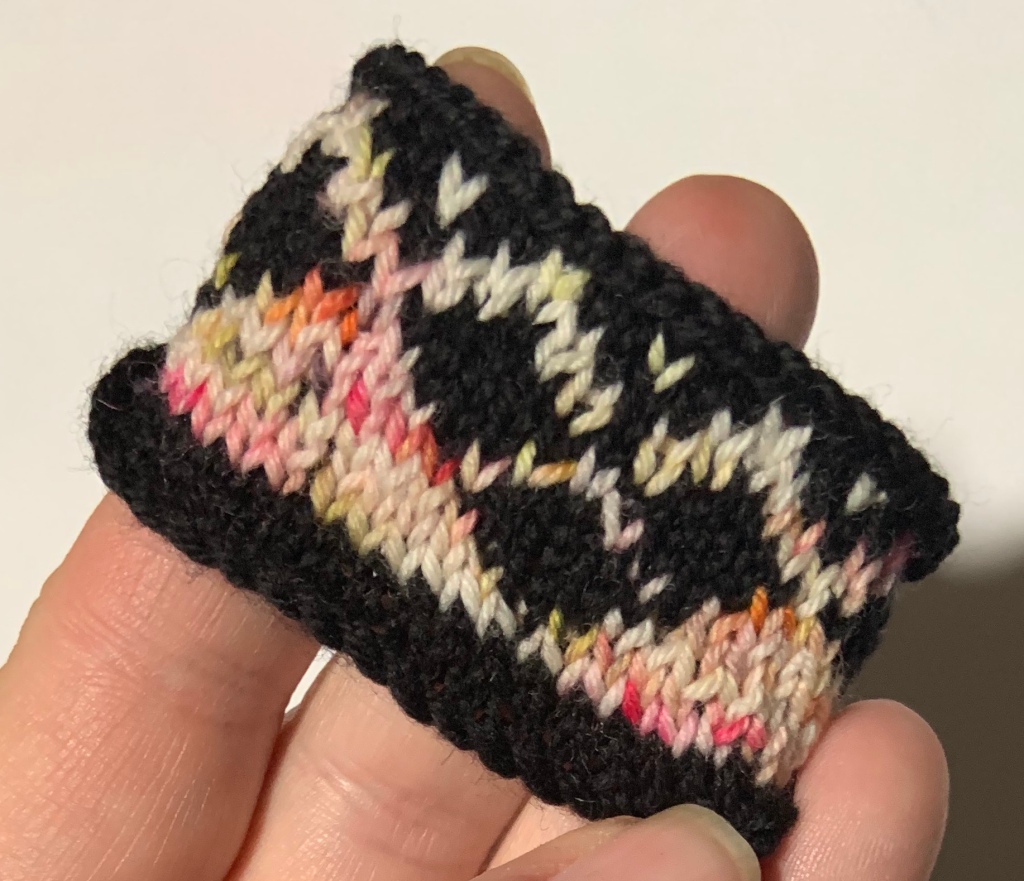
And here’s my finished little sample. I have worked all 13 rows from the bottom to the top and then bound off in black. While I made this one specifically for this post, I do often knit mini swatches in the round like this when I am working out color combinations or test driving a pattern.
For small patterns like this one, I don’t have much trouble following my rows. For larger patterns (20 rows or more), I will use some kind of marker or an advancing yellow sticky (printed patterns). If you are viewing your pattern on some sort of device, using programs that allow you to temporarily mark the row you are on are quite useful.

Here’s the back of the sample swatch; you can see the floats or strands of the unused color. Remember to keep these loose; they have no give at all and you don’t want your finished project to be too small.

Here’s the same motif used in an actual project, a cowl that I designed called Grimm’s Black Forest Cowl.
See? Interpreting charts is not so hard at all. Once you are comfortable with different colors for the squares, and following along with your knitting, you are ready to move on to the more complex charts like the ones used for lace and textural patterns.

Wow, Lizzie! Your designs are beautiful! I could easily follow your charts. My issue is the chart I am working with has a pattern repeat that is outlined in red yet there are other stitches outside this that I cannot seem to get in alignment. I wish I could attach it! Anyway, thanks for the link to your site. 😊
LikeLike
You’re welcome! Glad you checked it out before admin took it down 😢. If you have a photo of your problem chart you can send it to me via email at: lizzieknitzz@gmail.com. I’ll take a look at it. When you say you can’t get them in “alignment” what do you mean?
LikeLike
big time help needed… i’m knitting sweater’s yolk, carrying 2 strands of mohair.. the color work chart driving me nuts! i knit the repeat but on either side of the repeat (the sleeve inc area??) the stitches are growing out of control!!! do i need to constantly add these stitches at every sleeve area then the repeat then the next sleeve area with the numerous stitches growing out of control!!! so confusing
LikeLike
Yes, you will have to grow your motifs as you add stitches. It does look messy around that seam. I usually keep 2 ST in the main color on either side of the BOR as a kind of faux seam. Then I allow the motifs to grow out of that on either side. Makes it a lot less chaotic looking.
LikeLike
Long time knitter but not with colorwork. I got 10 rows into a colorwork pattern before I thought to myself… maybe I shoujld be reading this chart right to left in line with my knitting.. Came looking for instruction and yup! I was right. thanks for the instruction!
LikeLike
I’m so glad you found it helpful!
LikeLike